4.29.2011

More Kitchen Love

It's no secret that I would love a fresh, crisp white kitchen with subway tiles, pretty countertops (dark or light) in a flat, honed finish and a worn wood floor.  (Found here and here.)  However, after seeing what my white appliances look like at the end of the day, it would be one hot mess in there all of the time!

I saw this kitchen today and fell in love!  Such a pretty, warm cabinet color mixed with a crisp white backsplash.  I have to say that the fabric makes the room.  It wouldn't be so fabulous without it.  Of course, the beautiful dishes and vintage collections don't hurt either.

via urban grace interiors
Be sure to read her before/during, reveal and the details post to soak up all the loveliness of this kitchen.  Love, love, love!!

4.26.2011

A Happy Easter Birthday!

Yeah.  I was a good church, super sugared up, egg huntin', birthday celebratin' kind of a day.  And the weather was nice too.

4.19.2011

Dream of our Old Home

Last night, I dreamt that we re-bought our old house.  It was kindof a strange dream.  I think it was brought on because I found this picture I took of my littles sitting on the doorstep yesterday. 


Oh how I love this little picture.  That was his version of smiling that month.  Cowboy boots with shorts, check!  She was just as sassy at one as she is today. 

Anyway....I dreamt that we bought the house and then I did everything that I wanted to do to it when I lived there but didn't.  I didn't do it because we weren't going to stay in that little house for more then 3 years.  And I worried that it wouldn't be as appealing to the masses if I did what I wanted.  I realize now that I was crazy to think that because really, it maybe would of sold faster if it wasn't so plain.

First, I would of added more bushes and plants to the front garden with a rock path from the driveway to the front door.  I would of painted that front door a bright yellow or red.  I would of made it look more like the little cottage that it was at just under 900 sq feet. ( It was something like 15 big steps from the front door to the back door and the most efficient use of space with not one nook or cranny wasted.   I could clean the house from top to bottom, front to back in just 2 1/2 hours!)


In my dreams, I enjoyed the freshly painted kitchen cupboards with the brushed silver pull handles (that I did buy but never installed) instead of worrying that the next owner would think that they weren't new cabinets.  I enjoyed the wood laminate floors that I wanted.  Much easier to clean then the big expanse of light vinyl that showed everything.


The front room would of gotten some color and hung something above the sofa.  And dark red and dark green?  I've never really liked those colors, but, I thought that was what you were supposed to do.


Those were just a few of things that I wished I'd done.  Silly dream?  Sure.  But looking back, those were little things, most not too expensive, that I could of done to make my house more our home.  It was a long process selling that house.  I see now that if I had done more of these things, my house may have been more appealing.  Hopefully, I've learned something from that experience.  Hopefully, I've learned to love and make my house now, my home.

4.17.2011

World Market Rug

I found this rug today while vegging out in front of the computer... 


world market rug
Yup.  Pretty much in love with it.  My front room is in desperate (okay maybe a little dramatic there) need of a new rug.  Preferably one with lots of color.  'Cause my room needs some color, just like my header.  Color that doesn't match what is in there.  'Cause I like it like that. 

My birthday is coming up next week.  How about a BIG present for me this year honey?

4.15.2011

Peeps!

Peeps! 

You either love 'em or hate 'em.  I happen to love them.  Mmm, mmm...sugary goodness.  Join me at Ribbon Scissors today for some good inspirations. 

4.08.2011

Distressed Flowers - Details about Spring Kits

Let's talk about the details of Spring shall we?  All the embellishments add a lot of dimension and fun.  There are a few little details that I thought would be fun to show you how to do. 

Here's how I made my flowers. 

Step 1:  Find all your pieces*.  There are two six-petal flowers, two larger circles and two smaller circles.  Good job!  (*These papers are different then your kit.  Please refer to the photo for the correct papers for your kit.)


Step 2:  You are going to distress the edges of your circle.  You can do it either by using a little distressing tool or your fingers.  I really like the Tim Holtz paper distresser.  It's been quite handy.  I found it Heartland Paper recently and I like it much better then my old Heidi Swapp one.  If you have a distresser like this, just rough up your edges.  Otherwise, use your fingernail to scrap along the edges of your circle to rough it up.  You can even get the paper just a titch wet to help the process along a little bit.  Be careful not to tear your paper and let them dry completely before you glue them together.


Step 3:  Crumple all of your pieces.  I love the dimension it adds!


 Step 4:  Layer and glue your flower together.  I like glue dots or hot glue since they are quick. 


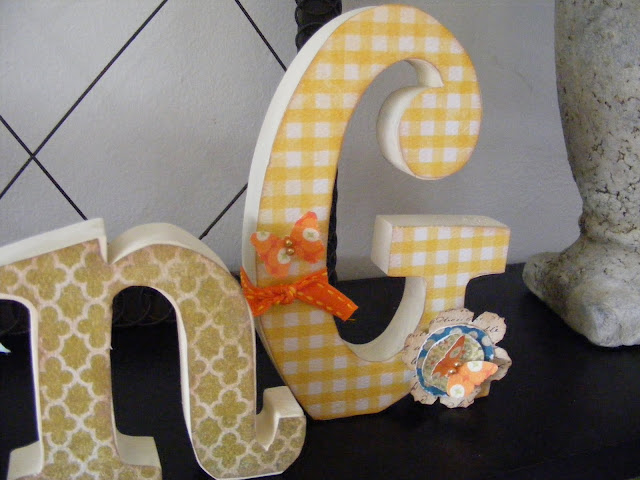
Add your top embellishments and glue to your letters. So cute!


Other details, bend all the butterflies wings out and/or roll under and use a pop dot underneath them.  Tie a bow to the upper part of the letter "S" and glue a cream butterfly on top of it, then glue the patterned butterfly on and add two gold pearls.


Use a dab of hot glue on the back of the birds beak and hold the wire in place until glue cools down.  Then glue the flower to the end of the wire.  Tie a ribbon the birds stand and your little set is complete!  


If you have any questions, please feel free to ask.  Thank you and enjoy! 

Let's Make that Pleated Flower for the Birds Tutorial

If you aren't familiar in how to make these pleated circle flowers, let's take a quick minute to show you how.  They are super simple and fun to make in all sizes, colors and mediums.  Mmmkay, here we go:

Step 1:  Locate your 1/2" x 12" strip.  Got it?  Good!  Phew, that was the hard step!  I kid, I kid.  Just looking for a reason why I took this oh so important photo.


Step 2:  Crease your strip every 1/4" inch either by hand or with a scoring tool.  I love my Martha Stewart scoring board.  They can be found locally at Michael's and Ben Franklin's for about $20.  Veeeery much worth it my book!  If you don't have a scoring tool, no biggie, just fold your paper mountain and valley style by hand making sure you make nice crisp folds. 


Step 3: If you haven't folded your paper, fold it mountain/valley style now.  You will now have an accordion folded strip now.

Step 4:  Using a strong adhesive, glue your ends together to form a circle.  I used my hot glue gun since it was handy, but I also like Scor Tape.  Who am I kidding.  I LOVE Scor Tape!!  (FYI, Kathy sells it on her blog.  Woot!)


Step 5: Here's the tricky part.  Push your circle inwards to flatten out the paper into a pleated circle.  Glue strong glue to one of your circles and press into the center and hold it there until the glue dries.  I always use hot glue since it's quick and easy.  Just don't burn yourself.  Ouch! 


Step 6:  Glue a circle onto the top, embellish and voila! All done!

4.07.2011

Paper Flower Tutorial - or - How to make that awesome flower on your Happy Easter Kit

Thank you all that signed up for my classes!  I've had a lot of fun meeting you and getting to know you.   There were a lot of kits this time due to it being Spring break so I just wanted to pop in and show you a few techniques that I used to complete these kits.  First up, the Easter tutorial.  There is a large, dimensional flower on the Easter blocks.   There is no real set way to do this but this is how I like to do it. 

First, grab your largest flower* and crumple it to give it texture.  (In these photos, I did this as the 2nd step but I have since found that I like it better when I do it first. )  You can do this as much or as little as you would like.  I like to crease each petal in half. (*Please note that this flower is not the same as your kit. Your kit will have the large hot pink flowers, the second flower will be similar with writing or ledger lines, the 3rd flower is the numbers and the little flower is dark green.)


Next, wrap each petal around a smooth round object like a pencil, pen or dowel.  This flower, I rolled each petal in since I wanted my flower to come out. 


Your flower will look something like this.  If it looks a little too much like a dead spider, no worries, just flatten it out a little bit.


Do the same with the other large flower found in your kit and then layer each flower on top of each other making sure that the petals overlap.


Crumple up your next flower and repeat the technique above.  Crumple, flatten, roll.

 Layer on the flowers.  Secure with glue dot or paper adhesive of your choice.  I often used a light layer from my glue gun.


Repeat with your next flower.  Repeat after me, crumple. flatten, roll. 


Top with your smallest flower.  Make sure that everything is glued together securely. 

Top your flower with one of your larger gems and adhere to your letter with paper adhesive, pop dot or your glue gun.  Whatever floats your boat friends! 

It's easiest to place your flower first and then add your leaves.  So, let's get those leaves made shall we?  Crumple your leaves for texture and then crease the leave in half.  Dab glue to the end of your leaf then tuck your leaves in where  you want them on your flower.  Notice that my leaves and flower go over the edge of the block.  Here's the final product:


Cute!  You've got a show stopping flower that you can brag about to your bestest buddies.

Here's the other details:  use your same crumple, roll, fold techniques on the little flower.  Fold your little butterflies wings out and use a small gem to butterfly center.   Tie the ribbons to the wings and glue to your letter then top with a gem over the hole of the ribbon ring.  (Didn't get the velvet ribbon?  Sorry!  It's at Robert's waiting for you!)


Add three smaller gems to the flowers of the bunny.  


And yer done!  If you have any other questions, please feel free to contact me.  Thanks!

Related Posts with Thumbnails