Showing posts with label Ribbon Scissors Studio. Show all posts

12.30.2011

"Behold Him" and "Let It Snow" kits available

**UPDATE AUGUST 2013**
Limited number of original kits available as of August 2013.  Please go to this post here for more information or use the Paypal link on the left side of blog to order your kit.  Thanks! 


There has been a lot of interest in my "Behold Him" Nativity blocks and "Let It Snow" blocks.  I am able to reproduce a limited number of kits and am currently taking a list of people interested.

Kits must be pre-payed and will be shipped unless other arrangements are made for local people only.  Please click on this link here to find further information about these kits or feel free to email me at megitys(at)gmail(dot)com.  Thank you for your support!  Big hugs!  Megan

**Behold Him kits available for pre-order now! Please click here for details about kits. Paypal links are located on my left sidebar.**

9.30.2011

Mums the Word

Word Problem:  
What takes three small mums, 
an ice bucket, 
and a silver thrifted platter?

My Autumn chair decoration of course! 


This project was as simple as could be. Inexpensive too coming in a just under $6.  Not bad for something that makes me happy.  Proof that it's the little details that make me happy.

*************************

**Come join me over at Ribbon Scissor's today!  I'm showing off my new Autumn decor including my Autumn letters that I like so much!  Witches Brew class is next week!  Space still available so come and join us!**


Have a lovely weekend! 

9.02.2011

New Class - Vintage Inspired "Witches Brew"

I'm hanging out over at Ribbon Scissors today announcing my newest class, "Witches Brew". 

Go and check 'er out!  I would love to see you in my class but if you can't make it, these kits can be picked up or mailed.  Any questions?  Feel free to ask!

Have a great weekend!
Megan

8.24.2011

Somerset Holidays & Celebrations Volume 5

Hey ya'll!!  I've been out for longer then I intended.  Last week, I had what was supposed to be a simple out-patient surgery that I didn't recover so well from.  Apparently, I'm good at causing a little drama.  :)  I'm in the midst of a million tests but I'm starting to feel much, much better and am working on getting on top of things again.  Thank you, thank you, thank you to all my friends and family and especially to my wonderful husband, for all your love and support.  Ooo and the treats you've showered us with.  Mmmm, love me some confectionery goodness!

Moving along, I'm very excited to finally tell you that my Spring wood letters have been featured in Somerset Holidays & Celebrations Volume 5

Somerset Holidays & Celebrations Vol 5
 I am flattered and floored to be a part of such a great publication!  This magazine can be found at Barnes & Nobles, magazine stands or ordered online. 

Lookie!  I'm in chapter 4!

A limited number of "Spring" wood letters are available in my Etsy shop if you are interested.   These will be the letters only.  The paint, paper and embellishments are not available at this time. 

There are so many great projects in this magazine!  I can't wait to devour it's contents.  It's been fabulous to be involved in the project.  Thank you so much!

8.12.2011

Craftin' to Celebrate at Ribbon Scissor's Studio


Come join me at Ribbon Scissor's Studio to see why I'm celebratin' today.  

Have a happy weekend!  We are starting off with a bang.  Headed out to go and pick up something exciting (see Ribbon's) and go out to L.A.Goon with the kidlets.

The Bombora is my boys' new favorite ride.  My daughter, um, not so much.  She screamed her head off and ended with tears.  Thrill seeker she is not.  You see, the Bombora is a kiddie roller coaster.  Wow.  She takes after her Dad.

8.06.2011

Ribbon Scissor's Studio Honor Roll

Today, I've decided to share a few things that have caught my eye this week.  Come on over to Ribbon Scissor's Studio and have a look! 

Have a great weekend!
Hugs!
Megan

7.21.2011

Fresh Lemonade

My newest class is coming up quickly!  How Summer flies! 

Vintage Inspired
"Fresh Lemonade" Blocks


These blocks are sunny and vintagey featuring the prettiest lemon paper and a vintage lemonade ad.


Class is tommorrow, July 22nd,  at the So. Jordan Robert's (10551 S Redwood Road) July from 6pm-8pm.  There are still a few spots open for the class or kit.

Next week, July 29th, class will be at the Layton Hobby Lobby (1080 North Main Street) 5:30pm-7:30pm. 

As always, if you can't make it to the class, kits with instructions are available. 
This is a limited edition kit!  More details can be found on my class page here.

Please feel free to contact me if you have any questions at megitys@juno.com
I look forward to seeing you in class!

7.08.2011

Celebratin' and Playin'

Summer is fun!!  After a week of playin', travelin', swimmin' and celebratin' (and computer fixin') we've come to halt and are just enjoying doing nothing. 


For the 4th, I had fun decorating the outside of my house.  I made a quick banner and a fun star door hanging.  Join me at Ribbon Scissor's Studio today to see how to make one for yourself.

6.23.2011

4th of July Class


I've got two kits left for my vintage inspired 4th of July blocks class coming up this Friday.  If anyone is interested, please let me know.  I would love to have you in my class, however, the kit has instructions on how to assemble and can be done at your convenience.  Shipping is available if wanted. 
Thanks!

6.18.2011

Home Town Entertainment

We've been having too much fun with home town entertainment.  Come on over and visit me at Ribbon's Scissors and see what we've been up to.

Have a great weekend!

5.24.2011

New Class - Dates Announced - Vintage Inspired 4th of July Blocks

Nice thing about having your own blog is that it's still there when you want.  I've been busy, busy, busy!  Finished many projects including one of my new classes that I'm super excited about.  If you follow Ribbon Scissor's, you'll see that I announced it last Friday.  But now I have my dates!

Three cheers for the red, white and blue!  Vintage inspired 4th of July blocks.  


What is more American then sparklers, pinwheels and Uncle Sam?  


With Robert's closing in Centerville, I've been floating around looking for the best place for me to teach.  I'm super excited to be teaching at the Layton Hobby Lobby!  It's location is ideal being right off the freeway, about 10 minutes from the old Centerville Robert's.  I will continue to teach at the South Jordan Robert's and kits are always available for those who cannot make the class times.

:*:Class dates:*:

*Layton Hobby Lobby (1080 North Main Street) on June 24th from 5:30-7:30pm.  (Please note the ol' Hob Lob closes at 8pm.)
*South Jordan Robert's (10551 S Redwood Road) on June 14th from 6-8pm.

Please visit my page on Ribbon Scissor's to sign up!
Thank you!!

5.13.2011

I've Been In A Rut

Yes, I admit.  I've been a rut for quite a while.  I'm finally ready to shake myself out of this dirty ol' rut and get out there and find some inspirations!  Join me over at Ribbon Scissors Studio for my latest finds. 

Oh the joys. I can't wait to play!

4.15.2011

Peeps!

Peeps! 

You either love 'em or hate 'em.  I happen to love them.  Mmm, mmm...sugary goodness.  Join me at Ribbon Scissors today for some good inspirations. 

4.08.2011

Distressed Flowers - Details about Spring Kits

Let's talk about the details of Spring shall we?  All the embellishments add a lot of dimension and fun.  There are a few little details that I thought would be fun to show you how to do. 

Here's how I made my flowers. 

Step 1:  Find all your pieces*.  There are two six-petal flowers, two larger circles and two smaller circles.  Good job!  (*These papers are different then your kit.  Please refer to the photo for the correct papers for your kit.)


Step 2:  You are going to distress the edges of your circle.  You can do it either by using a little distressing tool or your fingers.  I really like the Tim Holtz paper distresser.  It's been quite handy.  I found it Heartland Paper recently and I like it much better then my old Heidi Swapp one.  If you have a distresser like this, just rough up your edges.  Otherwise, use your fingernail to scrap along the edges of your circle to rough it up.  You can even get the paper just a titch wet to help the process along a little bit.  Be careful not to tear your paper and let them dry completely before you glue them together.


Step 3:  Crumple all of your pieces.  I love the dimension it adds!


 Step 4:  Layer and glue your flower together.  I like glue dots or hot glue since they are quick. 


Add your top embellishments and glue to your letters. So cute!


Other details, bend all the butterflies wings out and/or roll under and use a pop dot underneath them.  Tie a bow to the upper part of the letter "S" and glue a cream butterfly on top of it, then glue the patterned butterfly on and add two gold pearls.


Use a dab of hot glue on the back of the birds beak and hold the wire in place until glue cools down.  Then glue the flower to the end of the wire.  Tie a ribbon the birds stand and your little set is complete!  


If you have any questions, please feel free to ask.  Thank you and enjoy! 

Let's Make that Pleated Flower for the Birds Tutorial

If you aren't familiar in how to make these pleated circle flowers, let's take a quick minute to show you how.  They are super simple and fun to make in all sizes, colors and mediums.  Mmmkay, here we go:

Step 1:  Locate your 1/2" x 12" strip.  Got it?  Good!  Phew, that was the hard step!  I kid, I kid.  Just looking for a reason why I took this oh so important photo.


Step 2:  Crease your strip every 1/4" inch either by hand or with a scoring tool.  I love my Martha Stewart scoring board.  They can be found locally at Michael's and Ben Franklin's for about $20.  Veeeery much worth it my book!  If you don't have a scoring tool, no biggie, just fold your paper mountain and valley style by hand making sure you make nice crisp folds. 


Step 3: If you haven't folded your paper, fold it mountain/valley style now.  You will now have an accordion folded strip now.

Step 4:  Using a strong adhesive, glue your ends together to form a circle.  I used my hot glue gun since it was handy, but I also like Scor Tape.  Who am I kidding.  I LOVE Scor Tape!!  (FYI, Kathy sells it on her blog.  Woot!)


Step 5: Here's the tricky part.  Push your circle inwards to flatten out the paper into a pleated circle.  Glue strong glue to one of your circles and press into the center and hold it there until the glue dries.  I always use hot glue since it's quick and easy.  Just don't burn yourself.  Ouch! 


Step 6:  Glue a circle onto the top, embellish and voila! All done!

4.07.2011

Paper Flower Tutorial - or - How to make that awesome flower on your Happy Easter Kit

Thank you all that signed up for my classes!  I've had a lot of fun meeting you and getting to know you.   There were a lot of kits this time due to it being Spring break so I just wanted to pop in and show you a few techniques that I used to complete these kits.  First up, the Easter tutorial.  There is a large, dimensional flower on the Easter blocks.   There is no real set way to do this but this is how I like to do it. 

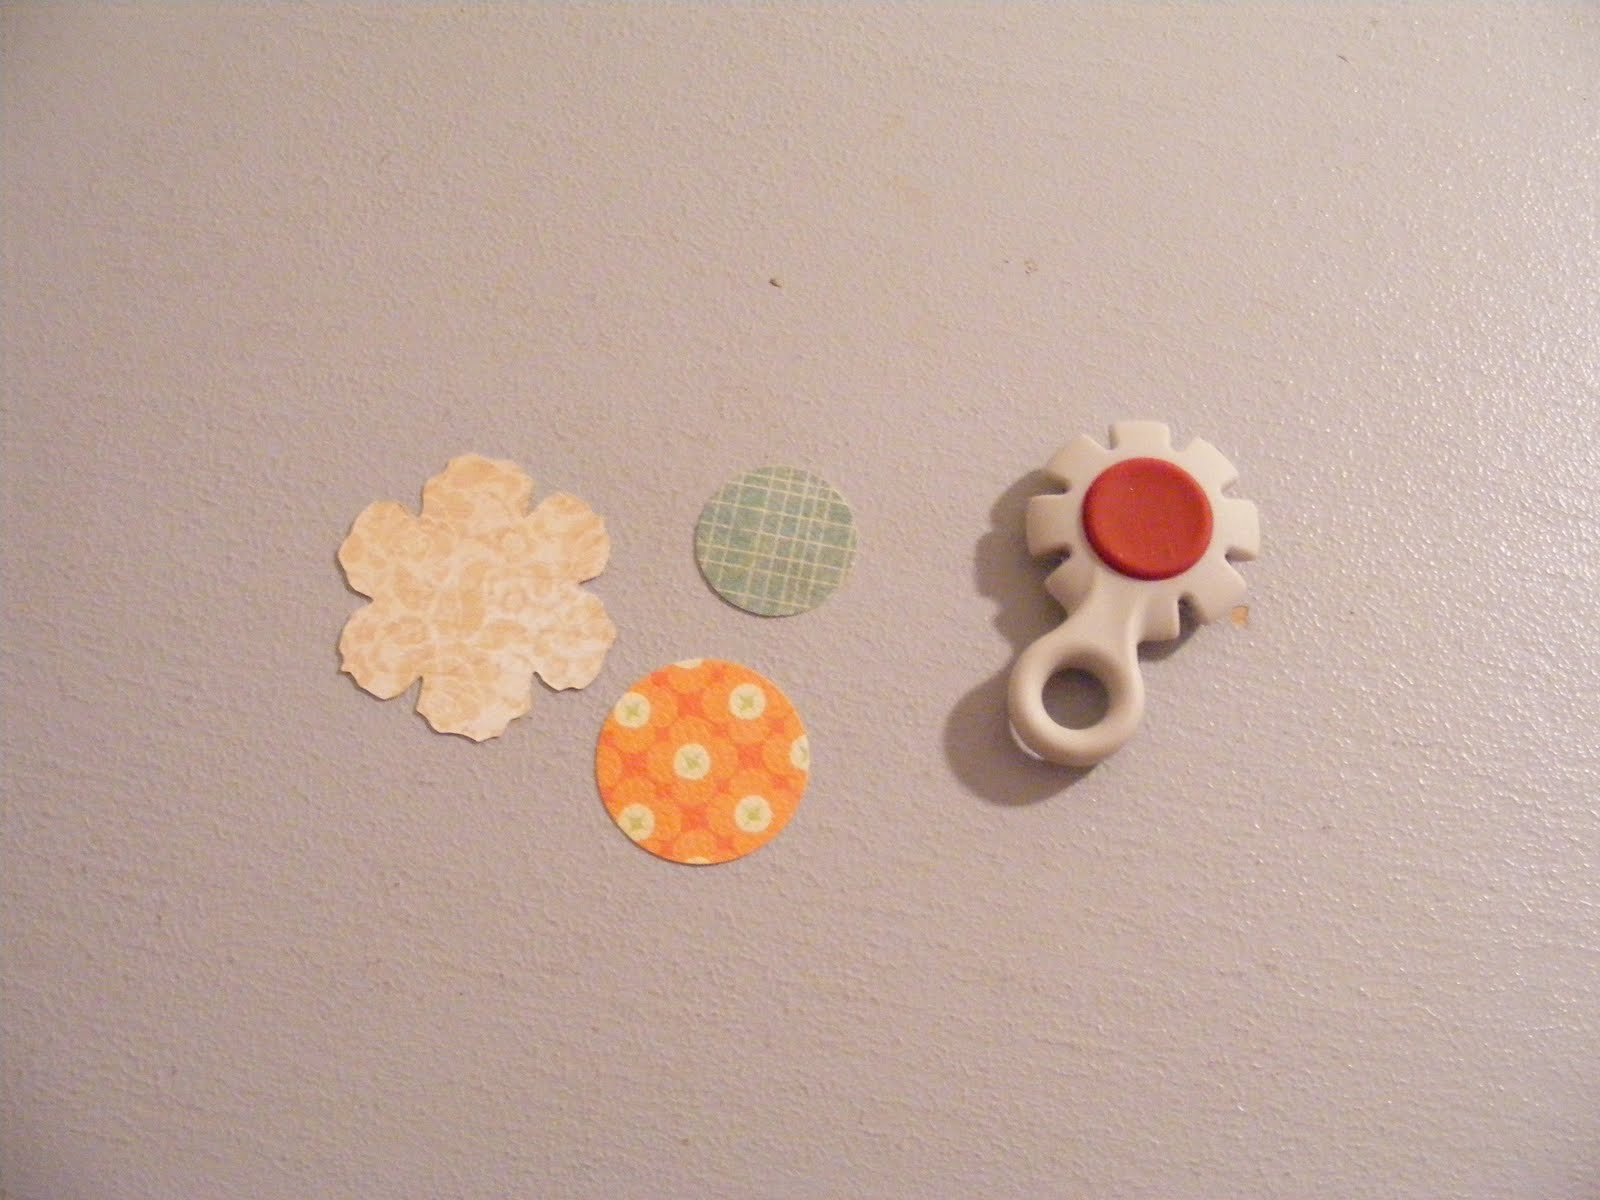
First, grab your largest flower* and crumple it to give it texture.  (In these photos, I did this as the 2nd step but I have since found that I like it better when I do it first. )  You can do this as much or as little as you would like.  I like to crease each petal in half. (*Please note that this flower is not the same as your kit. Your kit will have the large hot pink flowers, the second flower will be similar with writing or ledger lines, the 3rd flower is the numbers and the little flower is dark green.)


Next, wrap each petal around a smooth round object like a pencil, pen or dowel.  This flower, I rolled each petal in since I wanted my flower to come out. 


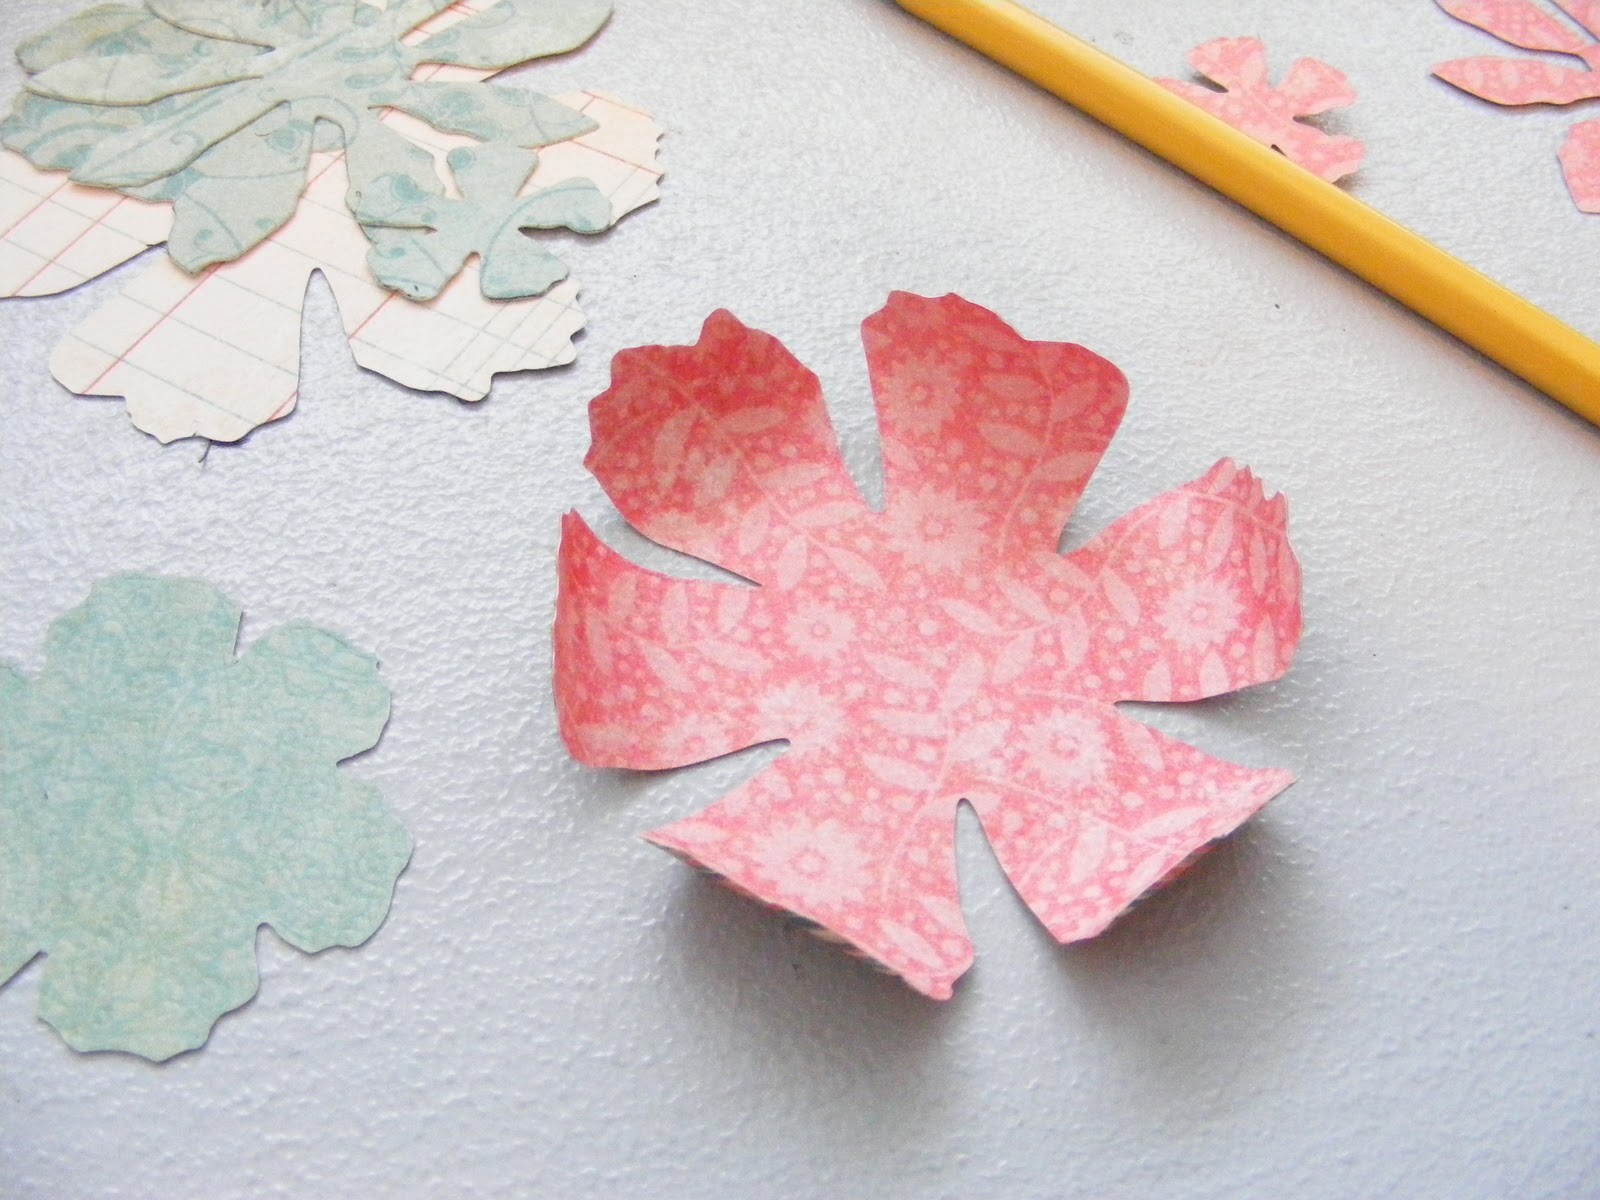
Your flower will look something like this.  If it looks a little too much like a dead spider, no worries, just flatten it out a little bit.


Do the same with the other large flower found in your kit and then layer each flower on top of each other making sure that the petals overlap.


Crumple up your next flower and repeat the technique above.  Crumple, flatten, roll.

 Layer on the flowers.  Secure with glue dot or paper adhesive of your choice.  I often used a light layer from my glue gun.


Repeat with your next flower.  Repeat after me, crumple. flatten, roll. 


Top with your smallest flower.  Make sure that everything is glued together securely. 

Top your flower with one of your larger gems and adhere to your letter with paper adhesive, pop dot or your glue gun.  Whatever floats your boat friends! 

It's easiest to place your flower first and then add your leaves.  So, let's get those leaves made shall we?  Crumple your leaves for texture and then crease the leave in half.  Dab glue to the end of your leaf then tuck your leaves in where  you want them on your flower.  Notice that my leaves and flower go over the edge of the block.  Here's the final product:


Cute!  You've got a show stopping flower that you can brag about to your bestest buddies.

Here's the other details:  use your same crumple, roll, fold techniques on the little flower.  Fold your little butterflies wings out and use a small gem to butterfly center.   Tie the ribbons to the wings and glue to your letter then top with a gem over the hole of the ribbon ring.  (Didn't get the velvet ribbon?  Sorry!  It's at Robert's waiting for you!)


Add three smaller gems to the flowers of the bunny.  


And yer done!  If you have any other questions, please feel free to contact me.  Thanks!

3.25.2011

Spring Flowers Pretty, Pretty Please

It's dark and dreary again today.  I'm sooooooo ready for Spring.  Join me over at Ribbon Scissors today for a quick and easy tutorial for pretty coffee filter Spring flowers

picture via katydid & kid
We're going to force Spring over here!

3.18.2011

New Kits Announced Today!

Today, I revealed on  Ribbon Scissors Studio my new kits!  I'm super excited about each and everyone of them because they are so Springy!  Welcome Spring! I'm sooooo ready for you.


Here's a few sneak peaks...


Go to Ribbon Scissors to see the rest!  Have a great weekend!

3.11.2011

Mod Podge Tutorial and a sneak peak!

Join me at Ribbon Scissors Studio today for some easy Mod Podging tips that ban the bubbles from your favorite projects.  Bonus, a sneak peak of my new Easter class! 

Have a great weekend!
Related Posts with Thumbnails